MEAN.JS is a full-stack javascript open-source solution for building the modern web application project using MongoDB, Express, AngularJS and Node.js. One of the great things about the MEAN stack application is that execution environment of server and client side can be written to a single language in an organized way.
This is a simple article about a quick overview installation of MEAN stack application with an example dependency injection using angular part and API integration of node js for saving the data to mongodb with a demo and sample code.
basic building blocks of Meanjs application : –
Installation
Before you start the framework installation, you should make sure that mongodb,nodejs and expressjs is installed to machine. Also two more tools needed for running the application are given below:
Bower
Bower will not minify your code as it just installs the given versions of the packages you prefered and their dependencies. Bower depends on Node.js and npm. Also make sure that git is installed as some bower packages require it to be fetched and installed.
$ npm install -g bower
Grunt
Grunt does repetitive tasks like minification, compilation, unit testing, linting, etc by configuring it through a Gruntfile. Install this globally and you’ll have access to the grunt command anywhere on your system.
$ npm install -g grunt-cli
RUN THE MEAN APP
Step 1 : Clone the git repository from : $ git clone https://github.com/meanjs/mean.git meanjs
Once you’ve completed copying the repository you should run this in the command-line:
Step 2 : $ npm install
After the installation of Node js dependencies you can able to run your application using Grunt
Step 3 : $ grunt
This will start a Web server and deploy the app to it. Next, open your browser and navigate to http://localhost:3000
NOTE : TESTING THE APP
By running the following command, we can run our karma unit test, it will also test some default tests that are already bundled with the template.
$ npm test
DEMO APPLICATION URL : http://jenson-angular-blog.herokuapp.com
FILE STRUCTURE
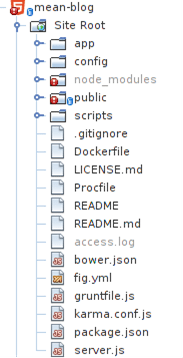
The basic file structure of Mean application consist of following folders and files:

The Mean.js splits over as two major parts which converts the framework to a modular structure
- SERVER SIDE
- CLIENT SIDE
The server part
The server side part consist of two folder and one javascript file, here, each folder should have different functionalities which are given below:
- app folder: The entire server side coding resides in this folder and it contains different parts of folder that has MVC (Model View Controller) design.
- config folder – Most of the configurations are controlled by this part, also it consist of different configuration for production, development and test.
- server.js: The Server.js file is the starting part of our application. Either Meanjs application can started by using grunt command or by using Node server.js in command prompt.
The client part
In this part, Angular side coding are designed as MVC structure, it includes different functional modules of controller, directives, filters, services and factories. It will also help you to structure current application better and makes it easy to test.
RUN SAMPLE TODO LIST USING MEAN JS
Here is an example of step-by-step implementation of a simple Todo application.
- Form creation and validation in angular
- Posting values to back end api using $http service
- Listing the data from the Get API request
- Delete operation
Form creation and validation in Angular
/*modules/core/views/todo.client.view.html*/ <section data-ng-controller="HomeController" ng-init="getTodoList()"> <h3>TODO LIST</h3> /*todolist form for submit values from the user side to angular controller*/ <form name="todolist" ng-submit="saveTodo()"> <input type="text" ng-model="todo.name" placeholder="Name" > <input type="text" ng-model="todo.place" placeholder="Place"> <button type="submit">Save</button> </form> /*........*/ </section>
he basic use of this form is used to submit the todo values from the user side to Angular controller, “saveTodo() “ is the function name used in Angular controller for receiving the values from the html page so that we can easily post the value to API using $http dependency in Angularjs.
/*modules/core/controllers/home.client.controller.js*/ /* * controller function used to post the values to api */ $scope.saveTodo = function () { $http.post('/save/todo', $scope.todo).success(function (response) { $scope.todoArray.push(response); $scope.todo = {}; }).error(function (response) { $scope.error = response.message; }); };
Here, the validation should be done with HTML5 using required=”true” in HTML form, so user will get an error message of red color border around the text box when trying to submit with null values.

Posting values to back end API using $http service
The following code is used for sending the values to backend API for saving to database
$http.post('/save/todo', $scope.todo).success(function (response) { $scope.todoArray.push(response); $scope.todo = {}; }).error(function (response) { $scope.error = response.message; });
You can create the /save/todo API URL using server side functions which are given below :
Create todo.server.routes.js file inside the app/routes folder and put the following code for creating the route in server side
module.exports = function(app) { var todo = require('../../app/controllers/todo.server.controller'); app.route('/save/todo').post(todo.saveTodo); app.route('/getTodoList').get(todo.getTodoList); };
Also create app/controllers/todo.server.controller.js for writing the server side code for saving the data to database, copy the following code for controller page.
exports.saveTodo = function (req, res) { var todo = new Todo(req.body); todo.save(function (err) { if (err) { return res.status(400).send({ message: errorHandler.getErrorMessage(err) }); } else { res.json(todo); } }); };
But here we need a model file for specifying the fields which are used in database collection, so create a modal file inside it with the following code in app/models folder ( app/models/todo.server.model.js)
var mongoose = require('mongoose'), Schema = mongoose.Schema; /** * Todo Schema */ var TodoSchema = new Schema({ name: { type: String, default: '', trim: true, required: 'Name cannot be blank' }, place: { type: String, default: '', trim: true, required: 'Place cannot be blank' }, },{ versionKey: false }); mongoose.model('Todo', TodoSchema);
Thus it will create a collection with name and place as parameter inside the collection in database.
Listing the data from the get api request
app.route('/getTodoList').get(todo.getTodoList);
This route is used for listing the already saved data from the collection by executing the following code inside the controller in getTodoList()
exports.getTodoList = function (req, res) { Todo.find({}, function (e, d) { res.json(d); }); };
But in angular side we need to call the API using $http, here I used ng-init() directive for initializing the get api for listing operation
First we need to put the ng-init() directive in HTML page and trigger the function inside the controller so we can call /getTodoList api.
/*modules/core/views/todo.client.view.html*/ <section data-ng-controller="HomeController" ng-init="getTodoList()"> //html part </section>
/*modules/core/controllers/home.client.controller.js*/ $scope.getTodoList = function () { $http.get('/getTodoList').success(function (response) { $scope.todoArray = response; }).error(function (response) { $scope.error = response.message; }); };
The above API will return saved todo list as response in success function which is assigned to a $scope.todo Array variable for listing purpose, thus we can print the above data in view side using ng-repeat directive module.
/*modules/core/views/todo.client.view.html*/ <section data-ng-controller="HomeController" ng-init="getTodoList()"> /*……copy code for form created in first step....*/ <table class="table" ng-show="todoArray.length"> <thead> <tr> <th>#</th> <th>Name</th> <th>Place</th> <th>Action</th> </tr> </thead> <tbody> <tr ng-repeat="eachTodo in todoArray"> <td>{{$index + 1}}</td> <td>{{eachTodo.name}}</td> <td>{{eachTodo.place}}</td> <td><a href="javascript:void(0)" ng-click="deleteTodo(eachTodo._id, $index)">Delete</a></td> </tr> </tbody> </table> </section>
Delete operation
This is the final functionality of our current application, here, I created a server side API for deleting the todo list from the database and which can get through the API function calling using $http by ng-click directive.

Conclusion
Writing apps with Meanjs framework is very fun and easy, also the distinction between client and server makes the app easier to maintain and test. I hope this article will help you in getting started with the MEAN stack
Have a project concept in mind? Let's collaborate and bring your vision to life!
Connect with us & let’s start the journey
Share this article

Get in touch
Kickstart your project
with a free discovery session
Describe your idea, we explore, advise, and provide a detailed plan.


